2026-04-08
Teaching my regular classes at the Ross Farnsworth - East Valley YMCA.
We spent more time than I would have liked talking about the chambered foot position for side snap kick. But, if the foot angle is wrong when you begin the kick, there’s a pretty good chance that it’ll be wrong when you make contact, which is less effective, and risks injury.
The optimal striking surface for side snap kick is the outside edge of the foot, just below the ankle bone, but to bring that to bear on the target, we need to chamber the kick with the foot held parallel to the floor (toes pointing forward) with the sole of the foot resting against the inside of your supporting leg. Most people can do this when the knee of the kicking leg is pointing forward (as in front snap kick), but most have difficulty with this position once they point the knee to the side.
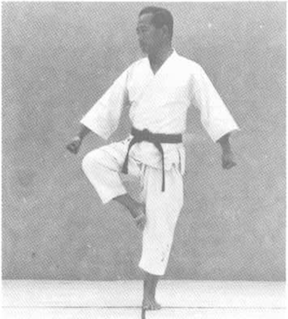
i.e. They have no problem what yoga calls the “tree pose”, but can’t do it with the toes pointing forward, instead of down.
I have two drills to help fix this.
- Most people are able to scratch the inside of one lower leg using the foot of the other leg, using a sort of up-and-down motion with the inside edge of the sole. To adapt this for side snap kick, we just need to scratch with the entire sole of the foot while raising the knee to the side. Another way to explain this (to adults) is to say it’s like the sole of your kicking foot is a match, and you’re trying to light it by scratching it against your supporting leg.
- If the student lacks the flexibility for this, you can have them stand with one hand against a wall for support, then use the other hand to lift their kicking foot up by the outside edge of the foot so the toes point forward. If they lack the balance to do this, even with their hand on the wall, they can do the same stretch while lying flat on the floor.